Bottom tap for a1 studs

How the engine works

Moderators: Greenleaf, KTA, BC847, Richie O

Bottom tap for a1 studs

Postby jethro » Thu Dec 11, 2014 11:06 pm

have been searching for an extension (long shank) m12x1.75 bottoming tap to reach down into stud holes with
head still on. I have found one at Kodiak cutting tools- h6 -or d6 (the oversize-ness) The extension ones seem to come in h6 and h12. I would think the smaller the better- as you would want the closest fit- AND you wouldn't want to make the
existing parts of the thread (above the bottom) any bigger than it is all ready.
They show it at 38 $

Has anyone used this one from this place ? m12 by 1.75, bottoming, h6, 6 inch overall length

Tim
jethro
fuel screw!!!!
 
Posts: 432
Joined: Sat Mar 08, 2014 12:32 am

Re: Bottom tap for a1 studs

Postby LandTug2 » Sun Dec 21, 2014 12:25 am

wow, I didn't know they made long ones that would work with the head still on. I am currently in the same boat as you and are ready to install some A1s but don't want to ruin a perfectly good headgasket. Ill be interested to see if anyone else chimes in on this.
'93 D250 5x16s, Stg1 pin, 3200 gov spg, stiffer afc spring, pump tuning, Super Harmonic Damper, Timing Spacer, hx35/ht3b compounds, 100 gpm lift pump, 12" Cone filter, Moog Springs, pyro/drive pressure/boost/f. pressure/tach gauges,valet switch, 4'' straight pipe, mag hitec dif cover
LandTug2
fuel screw!!!!
 
Posts: 46
Joined: Sun Dec 21, 2014 12:09 am

Re: Bottom tap for a1 studs

Postby jethro » Mon Dec 22, 2014 10:31 pm

I have ordered the long extension tap but it has not come in yet. (UPS)
It was coming from Kodiak tools in new York. I listed the part# in the previous post I believe.
It is 6 inches long total length.
It should work- just have to be careful and not break it- it should be large enough to be reasonably forgiving -
I am also waiting of the A1 studs as well.

got some 60# over valve springs from toxic diesel. Couldn't believe they got here in 2 days from Utah. They shipped
in a USPS flat rate 2 day box- right to my mailbox too. Great work Toxic Diesel ! Cant beat that kind of service !

Tim
PS - couldn't find the post with the product link- here it is:
http://www.kodiakcuttingtools.com/produ ... es=KTAP131
12 by 1.75- the "bottoming" version
(I suppose if you wanted to make the tapping easier you could get both the plug and the bottoming- do each hole in 2 operations. make the cutting more gradual maybe- but I don't know if the cummins tapped holes were made with a
regular tap or a plug. ( I would expect regular I think)
Last edited by jethro on Mon Dec 22, 2014 10:36 pm, edited 1 time in total.
jethro
fuel screw!!!!
 
Posts: 432
Joined: Sat Mar 08, 2014 12:32 am
Top

Re: Bottom tap for a1 studs

Postby LandTug2 » Mon Dec 22, 2014 10:35 pm

Nice!
'93 D250 5x16s, Stg1 pin, 3200 gov spg, stiffer afc spring, pump tuning, Super Harmonic Damper, Timing Spacer, hx35/ht3b compounds, 100 gpm lift pump, 12" Cone filter, Moog Springs, pyro/drive pressure/boost/f. pressure/tach gauges,valet switch, 4'' straight pipe, mag hitec dif cover
LandTug2
fuel screw!!!!
 
Posts: 46
Joined: Sun Dec 21, 2014 12:09 am
Top

Re: Bottom tap for a1 studs

Postby Tacoclaw » Tue Dec 23, 2014 4:20 am

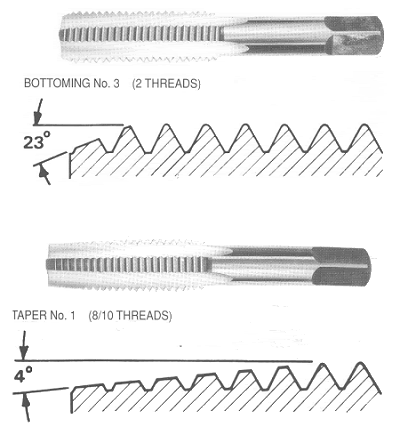
Factory threads were cut with a taper, you'll be cutting metal for the last turn or two.


The real question is what is your plan for cleaning out the holes? Doesn't matter how perfectly-tapped they are if you can't get all the oil/shavings out of them. I even had trouble getting mine spotless with no head on, I had a shop-vac and tiny screwdriver to clean mine, still took forever. If you could find some non-flammable brake-kleen and stir that in it would be helpful.

That oil really holds the metal/dirt pieces in there and you shouldnt tap the bottom dry. (heh)
1990 W250 4x4
Rattles, growls, whistles, and whines.
User avatar
Tacoclaw
14mm rotor
 
Posts: 4108
Joined: Wed Mar 11, 2009 7:50 am
Location: Cheshire, OH
Top

Re: Bottom tap for a1 studs

Postby BC847 » Tue Dec 23, 2014 9:32 am

Tacoclaw wrote:Factory threads were cut with a taper, you'll be cutting metal for the last turn or two.


The real question is what is your plan for cleaning out the holes? Doesn't matter how perfectly-tapped they are if you can't get all the oil/shavings out of them. I even had trouble getting mine spotless with no head on, I had a shop-vac and tiny screwdriver to clean mine, still took forever. If you could find some non-flammable brake-kleen and stir that in it would be helpful.

That oil really holds the metal/dirt pieces in there and you shouldnt tap the bottom dry. (heh)

Bottoming tap VS Standard tap . . . .

Image


I've always put the little extension tube on a can of aerosol solvent and flushed the bottom of the bore. Then chased it with a shot of compressed air through a piece of 1/4" copper tubing again, bottomed in the bore. The stuff comes flying out around the copper tube so don't have your head straight over it. ;)
David

1993 12mm VE Fueled W250 CC, Green
12.67 @ 103.35
Your basic farm truck ;)
BC847
Administrator
 
Posts: 2203
Joined: Wed Jan 03, 2007 5:22 pm
Top

Re: Bottom tap for a1 studs

Postby jethro » Tue Dec 23, 2014 6:05 pm

Tap came today-
Actually made in USA by regal tools. Looks nice visually.
Sold by Kodiak

I have a long blowgun extension made from a 3 foor piece of brake line.
Brake cleaner followed by the blowgun extension should clean out chips after about 4 iterations....
Hope it reaches all the way to the bottom. will find out in a couple of days.

Tim
jethro
fuel screw!!!!
 
Posts: 432
Joined: Sat Mar 08, 2014 12:32 am
Top

Re: Bottom tap for a1 studs

Postby PToombs » Tue Dec 23, 2014 7:34 pm

When I put in my ARP studs I had the head off. I found it was easier to tap with the regular until it stopped and then bottom tapped the rest. Using just the bottom tap I was afraid of breaking it off, it turned pretty hard in there. I sprayed with brake cleaner and then blew it out with a tube on the blowgun. Twice was good for me.
Good luck.
pete

Just enough power to break everything behind the crankshaft.
User avatar
PToombs
14mm rotor
 
Posts: 11367
Joined: Sun Jan 07, 2007 6:13 pm
Location: Syracuse NY. Snow central!
Top

Re: Bottom tap for a1 studs

Postby jethro » Wed Dec 24, 2014 12:37 am

Hi PT:
I wondered too if I should have ordered a plug style as well- so I could do it in 2 gradual steps.....
might do that yet once I "Feel" what this tap does when I attempt to cut with it.
How much additional depth would you say you achieved ? ( I am wondering how far I have to run the bottom tap if
I use that one alone ?--)

You did plug- then bottom ?
I am thinking - cutting oil, go about half a turn - then back out and do the spray and vac. cutting oil- half turn- spray-n-vac- ...etc


Tim
jethro
fuel screw!!!!
 
Posts: 432
Joined: Sat Mar 08, 2014 12:32 am
Top

Re: Bottom tap for a1 studs

Postby PToombs » Wed Dec 24, 2014 6:40 pm

I'd say I gained about 1/2 an inch or so from stock. I ran the regular until it bound, most of a turn maybe, then backed it out a 1/2 turn and in again. When it felt funny then I pulled it and just used air to blow the shavings out, then back in with the tap. Pretty much the same process with the bottom tap, but I had to blow it out more often because the space in the bottom for shavings to fall was getting smaller. I didn't use brake cleaner until I was all done, no use wasting it! ;)
pete

Just enough power to break everything behind the crankshaft.
User avatar
PToombs
14mm rotor
 
Posts: 11367
Joined: Sun Jan 07, 2007 6:13 pm
Location: Syracuse NY. Snow central!
Top

cooked tap extension-

Postby jethro » Wed Dec 24, 2014 10:35 pm

Wish I had ordered a long regular or plug tap now-
here is what I did- I had a regular one from hardware store (6$)
I bought a 6 inch 1/8 stainless pipe nipple. Put the tap in the lathe with the cutting part inside the chuck- but inboard the jaws. Turned on lathe. Used abrasive cut off blade to rough down the square portion remaining- until I got it down to flats.
Then I ran a carbide bit down it to true it up. Sized it to just drive inside the pipe nipple. Put silver solder flux on joint and
pressed them together. Dropped some flux into pipe nipple from other end so it ran down to interface. Dropped in about 1 inch of silver solder (high temp)
put tap and extension in stainless coffee cup full of water so all the tap threads were below surface.
Heated joint gradually with oxy till dull red. Tried to come off heat on tap shank very slowly. let cool in still air.
I expected to see the solder run out to outside of joint- but did not. I think I remember though- when I bought that solder I got the higher viscosity type which doesn't run away so easy. I think I will gently tap on the joint tomorrow on anvil with my 2 oz ball peen- the try tapping at test hole with it to try to verify the joing wetted. If I am still in doubt I can do another heat with some solder wire wrapped around the outside of the joint.(so I can see it get hot enough to wet.....)

Not sure how much I insulted the heat treatment of the tap shank- I think the get less hard as you move away from the cutting section. (if that helps...)

That should work IF the SS joint is good AN IF the shank hasn't gotten screwed up from heat.

If it doesn't- I blew 6 $ I guess-

and Kodiak will get another order from me..... :lol:

tim

PS 1/2 inch seems like a good little bit but that may be the just about the taper on the tap they used ?
Looking at the studs - looks like they want the little nub to touch before the treads tighten up. Should be able to feel that
fairly distinctly when I get there....
Started installing the 60 over valve springs tonight using the leslie thing with the wheel. All most not enough travel- have to screw the new spring into it before I start compressing. It worked ok on the first one though...
jethro
fuel screw!!!!
 
Posts: 432
Joined: Sat Mar 08, 2014 12:32 am
Top

Re: cooked tap extension-

Postby PToombs » Thu Dec 25, 2014 6:23 pm

jethro wrote:Started installing the 60 over valve springs tonight using the leslie thing with the wheel. All most not enough travel- have to screw the new spring into it before I start compressing. It worked ok on the first one though...


Toldja so! :lol:

It works ok like that, I had no problems. ;)
pete

Just enough power to break everything behind the crankshaft.
User avatar
PToombs
14mm rotor
 
Posts: 11367
Joined: Sun Jan 07, 2007 6:13 pm
Location: Syracuse NY. Snow central!
Top


Return to Engine

Who is online

Users browsing this forum: No registered users and 34 guests