HOW TO INSTALL A 2nt JEN INTERCOOLER W/ BOLT ON PARTS ONLY!!!
OK, First off, tool you will need
Basic tools ( Hammer Screw drive, Pliers Ratchet extension and socket set) 3/8 Drill, Hole saw, Hack saw or Jig saw, Tap and Dye set (5/16 or 3/8 NC tap is all you will need from this set) and a 3/8 Drill Bit Set...........O yeah a tape measure.
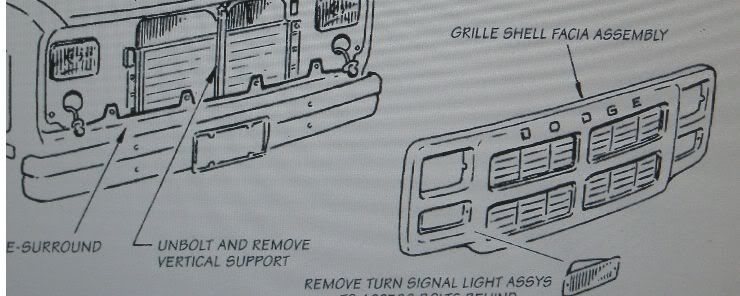
Open hood remove several screw from hood latch area, one screw each form behind turn signal assembly, and 4 screw from lower gill insert area.
NOTE 1: There will be several time that i will ask you to do something that I did not do or did Differently.
There is good reason for this..............My truck was the first draft, and you will gain from my mistake.
NOTE 2: All left (L) and right ( R ) will be as you are sitting in the drivers seat.
Now, find the lower A/C condenser bolt mount, on the drivers side or left side. Measure from center of bolt, over 1- 7/8” then up 1-1/2” this will be the center for the drill bit in your hole saw. The drawing shows 4-1/8......if you can go 4-1/4 or even 4-1/2 it would be better. But you will have to make this decision. I drilled mine several years ago to 3” and you can't us a hole saw to go bigger once you have made the hole. So make sure on the size before you drill.
Passenger side or Right side with be the same, only from center of lower bolt going out will be 1-11/16 and then up 1-9/16.
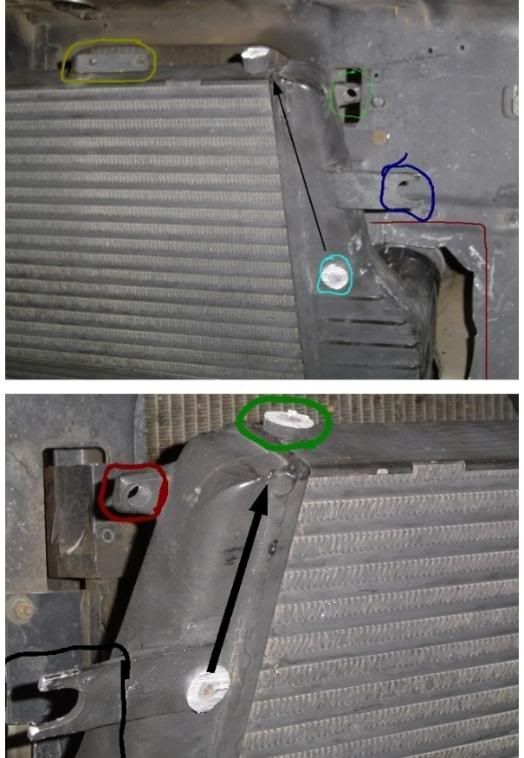
L side of radiator
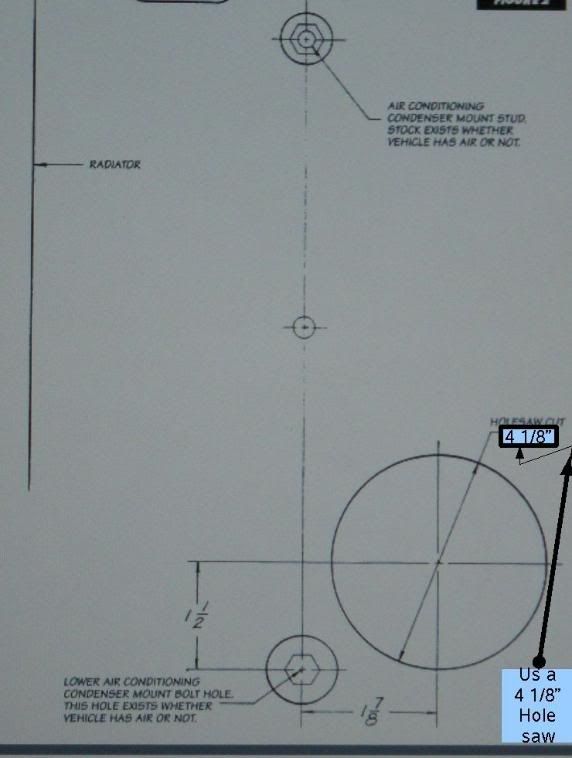
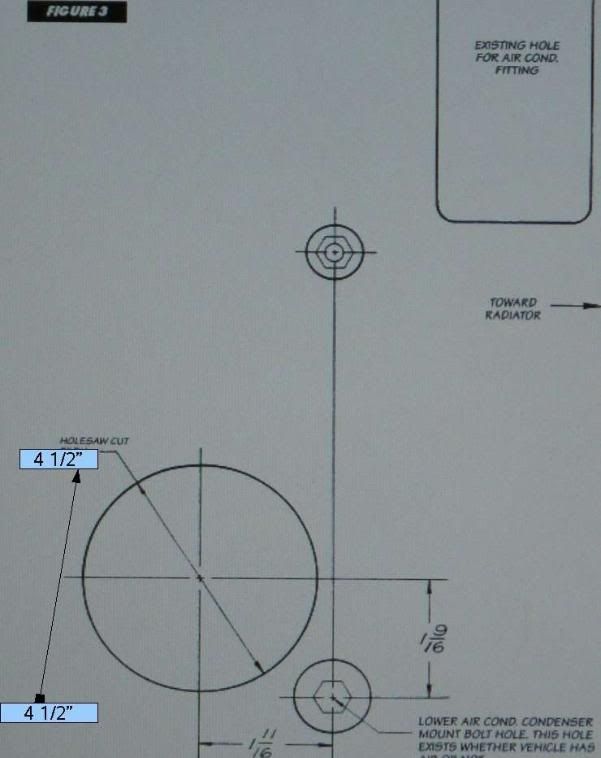
As you can see the pictures shows one at 4-1/8 and the 2nt at 4-1/2.... ONLY BUY ONE SIZE!!!.
"DO NOT" GO OUT AND BUY TWO DIFFERENT HOLES SAW BLADES.
If the hole saw is going to cut into the radiator support, that is fine! As lone as the hole saw is only cutting the outer U shape of the radiator support bracket, your golden (good:-)) Even if it cut into the flat part of the support a 1/16"you will be fine and will make shifting the inter cooler around, that much easier
Note: do not move hole saw over to accomplish this clearance. The drill bit in the center of the hole saw must, be as showed above.
The grill will need to me modified.

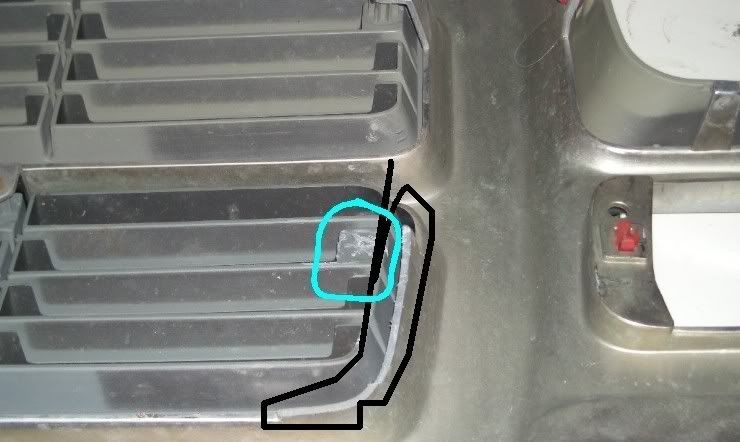
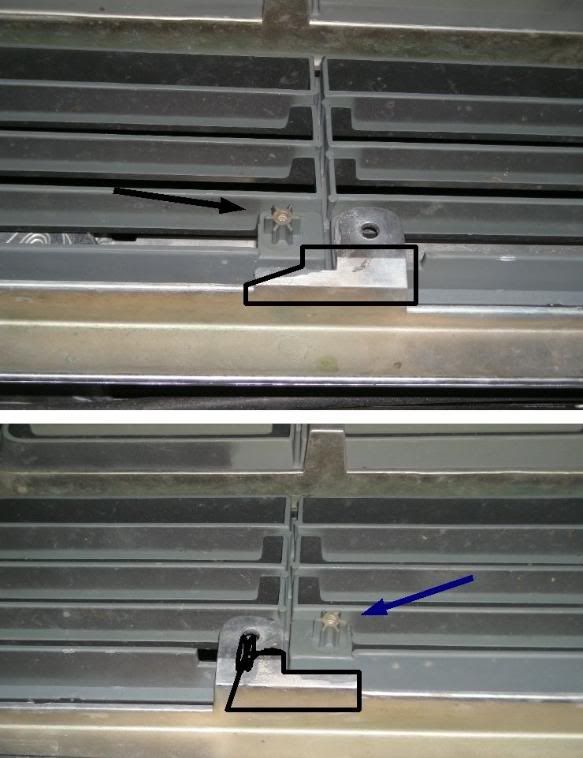
The next two photos ^ above^ show the center modification required .Leave the lug intact were the arrows show. This way the grill can be reattached in the lower center part of the grill.
The taller two ears as showed above should be removed.(black with out a arrow)
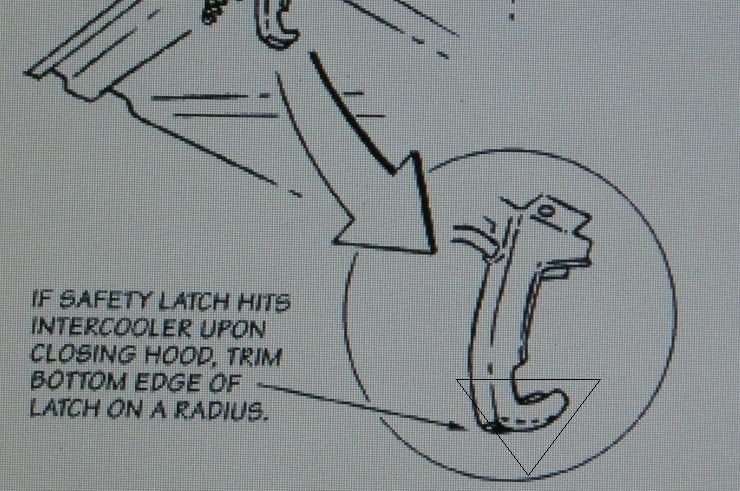
As well as the safety latch, if you us the larger of two 2nt gen intercooler(24V is one inch taller and and will require more mod's to fit.)
NOTE: The lower, 2 screw that attach's the grill to the lower surround MUST BE SHORTENED, or they will puncture the intercooler
When you us your hole saw, it should look just like this (lower part of upper picture).............except YOURS will be 4+ inches instead of 3 inches, and yours will be a lot less hacked then mine.
Now, the black,........ Yeah, don't cut that far in and leave the 2 middle bracket for the grill, as was showed above.
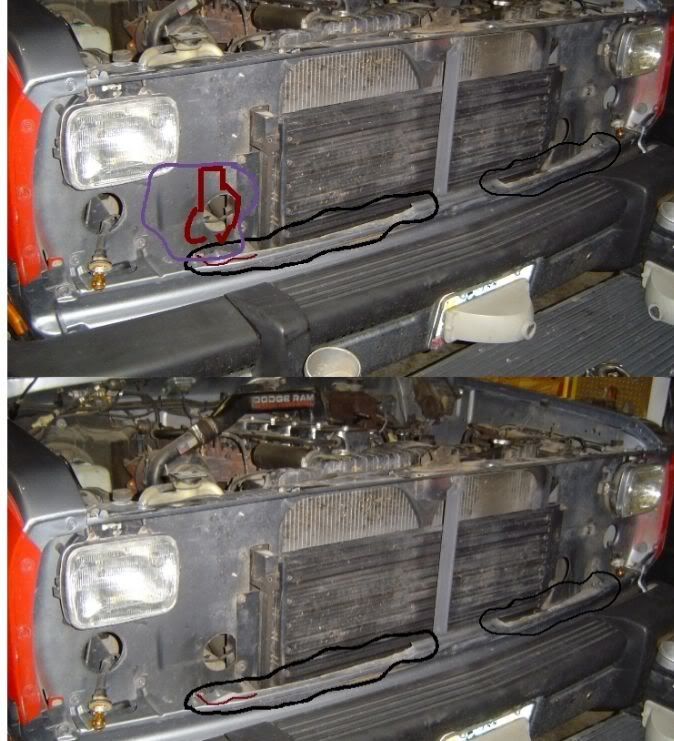
The lower surround trimming need to be extended further out as the red indicates.......on both sides. Don't worry the grill will hide all of your art work ;-}
I did not remove my front bumper...........TRUST ME, you will save a lot more time removing the bumper and the lower surround in the long run!
After you have cut you 4-1/8+ holes, test fit the inter cooler inlet/outlet for fit. You will see that the round hole is going to need some notches cut in the top and bottom of the round hole.
Once again you will need to decide how wide and how deep they should go. Word of caution, on the passenger side. Remove the coolant over flow bottle. One, because you will be drilling a hole right threw that area and 2nt the upward cut will go all the way to the bottom of the bottle. If the bottle is there, you will cut a nice hole in it!!!!!
O, if you still have the spare tire jack and bracket down there, you may need to remove that also.
In the lower half, of the lower picture, above,^..................^......................^. ..........
RED represent, kinda, what yours should look like when done
PURPLE is what i did to mine.......and as you can see the coolant over flow bottle will be in the way.
You have already remove that center support,....Right.
The picture below shows a 2nt gen lower inter cooler bracket, there are 2 of then. A round, and and a oval holed one. Theses are still available from the deal but if you are getting one from the wrecking yard. Might as well pick up the lower bracket and rubber insulators while your there.
The 3 to 4 inch, inlet/outlet boots are way, way expense form the dealer .
The most cost affective way to do this project would be to get all the tubes, clamp and pipes from the Wrecking yard.............for that matter, talk then out of the Hx35 Turbo and elbow. Now you have every thing you need for this project..............Well almost.........will get to that latter..............
When we install these lower brackets they will be swapped side for side (left bracket will be installed on right side and,...... of courses right will now, be installed on the left side.
My plan was to fit these lower mounts and then, get a tape measure out to give you spec, so you could get it in the right place.
Well it became simpler then that!!!!!!
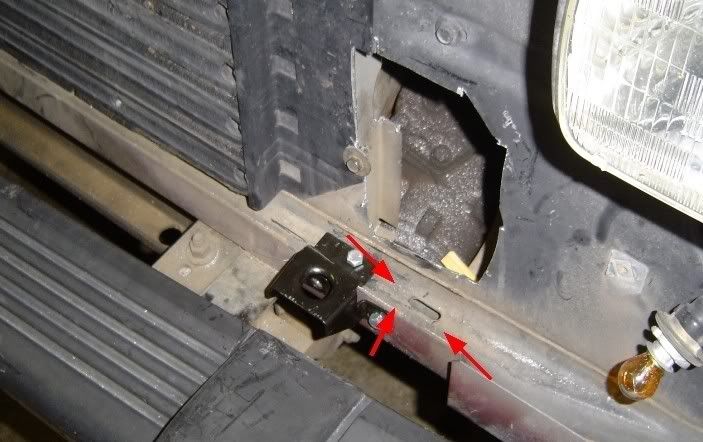
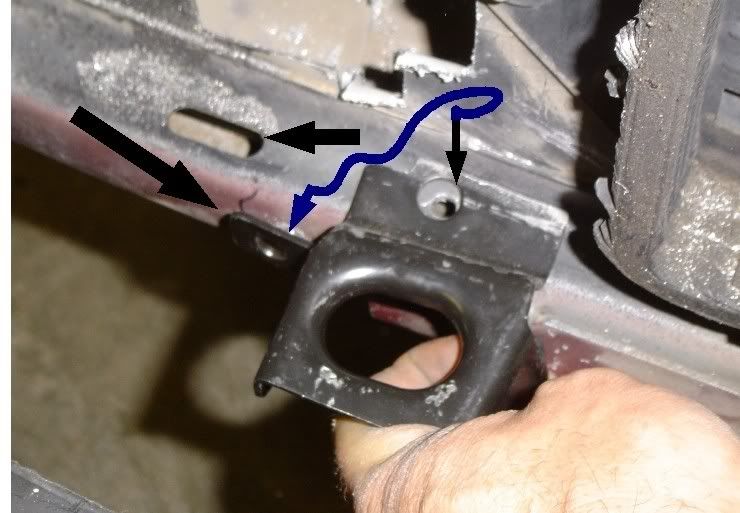
See the oval hole that the two top arrows are pointing too. Line up the brackets outer, lower edge with the oval holes inner edge......and it is in the exact spot you need.
Center punch or mark the center of both holes, move bracket out of the way and drill two holes.
If your going to us a 3/8 then drill a hole 2 sizes smaller then 3/8 and if you decide to go with 5/16 then drill the holes two drill sizes smaller then 5/16.
get your 5/16 or 3/8 course threaded tap and make your self some threads!
The holes that are just sheet metal thick, just snug up the bolts, as there isn't a lot of thread there, were there is the added metal support you will be able to snug them real good.
Note my hacked hole,.......... this side didn't turn out to bad, but the passenger side below. didn't fair so well
Same story here, inner oval edge lined with outer, lower edge of bracket. As you can see here, the oval hole in the bracket. If you are slightly off with your alignment's .......the oval hole in the bracket will compensate, making a good fit.
Now, before you go to fitting you inter cooler into place. There is several areas on the inter cooler that need to be modified and will be much easier out of the vehicle then in, like i did.
Now you can decide how long of a bolt you need. How long of a spacer you will need, and its time to drill a hole to match you upper ear you will be using.
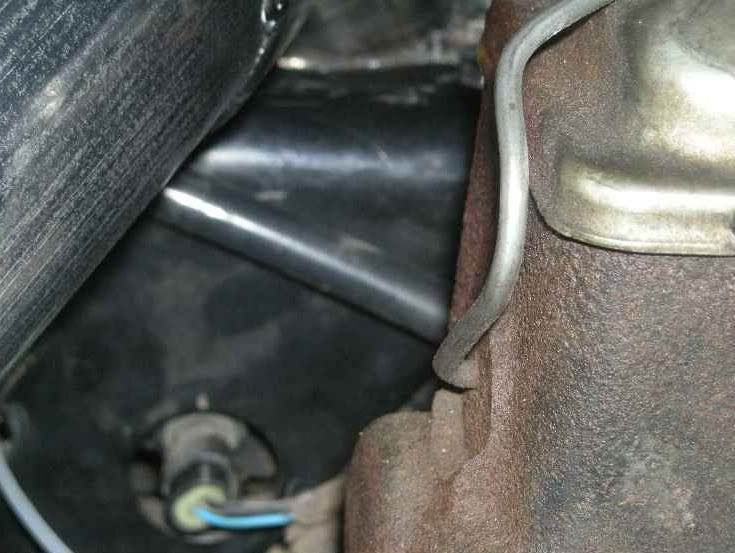
Note the two black arrows........that's the coolant bottle that you have already remove..........Right?
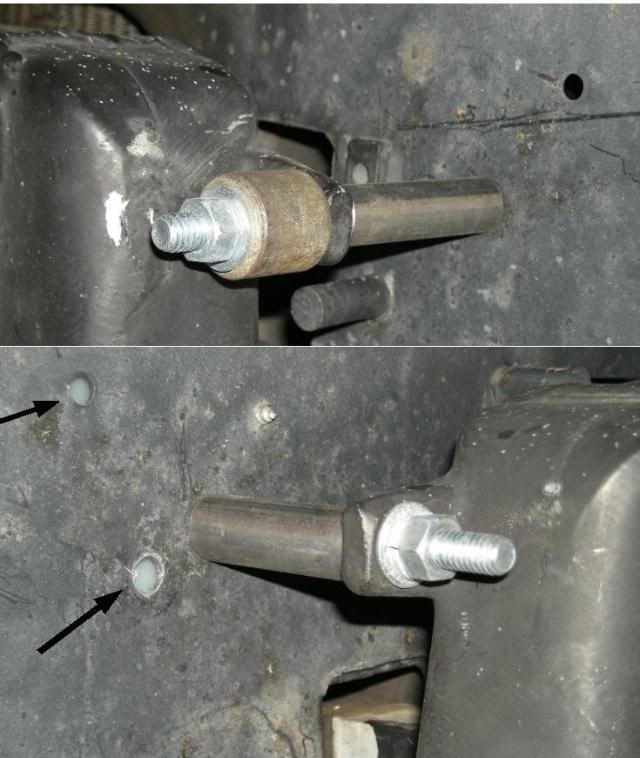
The head of the bolt will clear the over flow bottle with a small nut to space it out and still keep the same screws. There is actually a small pocket that the head of the bolt can.......Almost hide in.
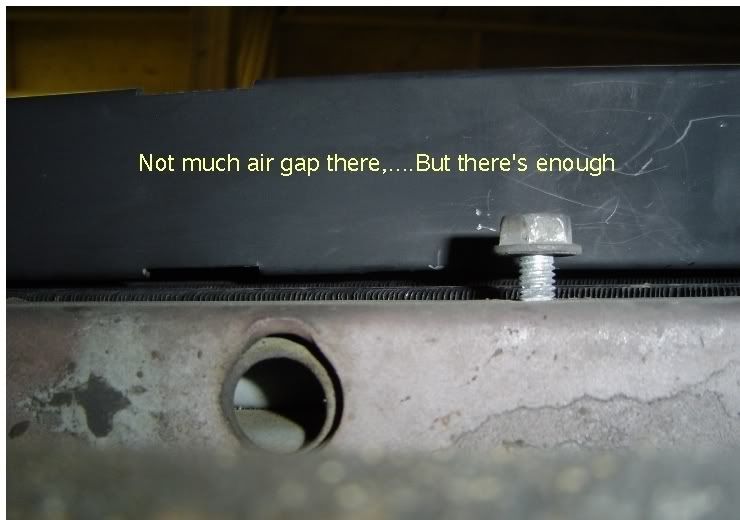
Before you snug these screws,put a piece of card board or some thing to create a air gap between the bottle and the intercooler tube.......Yes it is that close!!!!!!!
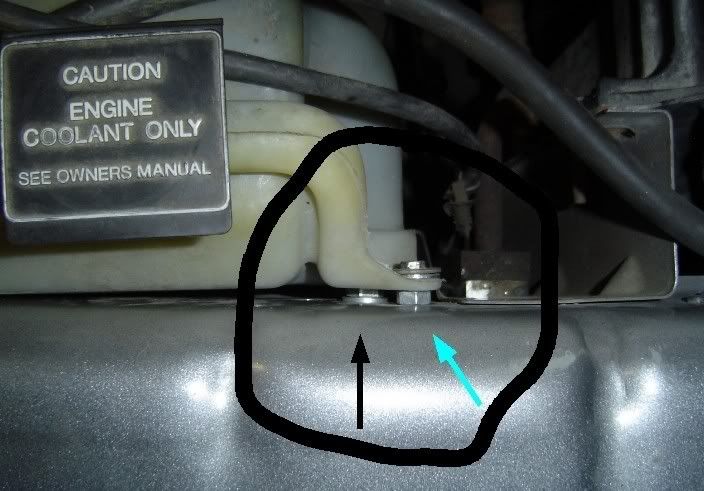
Black arrow is the head of the intercooler bolt, greenish blue arrow is the small nut i used for a spacer. the Screw you can see and the one directly below it, are the only spacing that was needed
This is looking from under neath the truck, up words. the top has a lot more room.
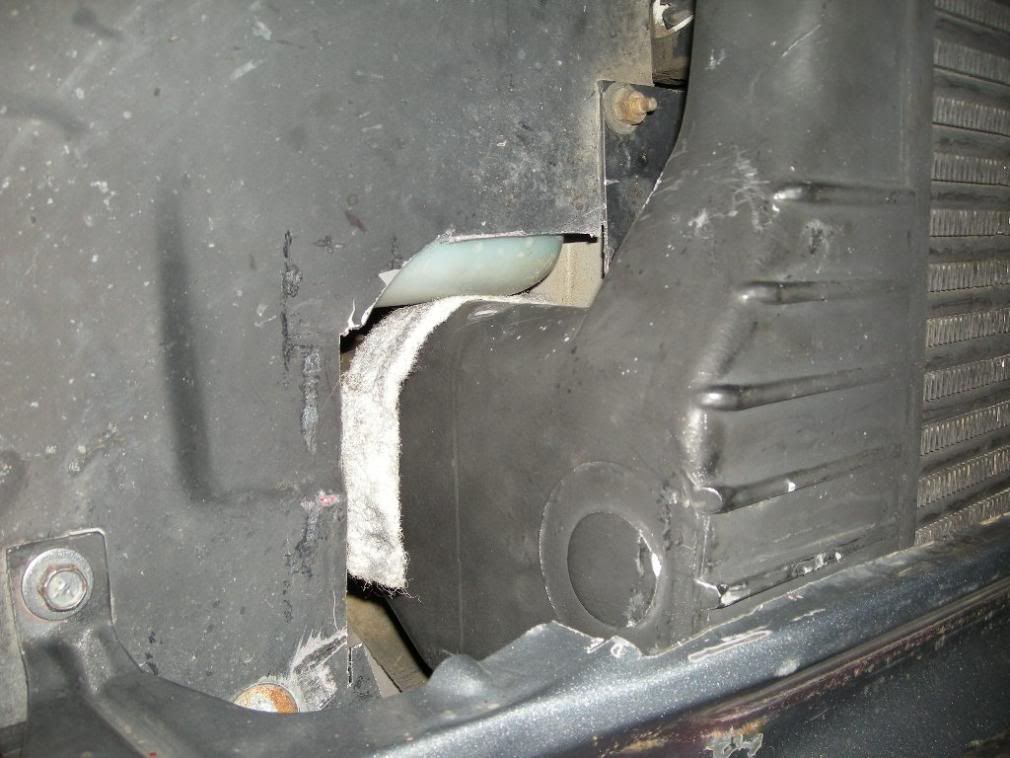
Here you see my hack job. But more important is the white insulation that i use to make sure there will be NO rubbing between the bottom of the over flow bottle and cooler, before you tighten the over flow bottle up.
Obvious, you Can't us your stock turbo...........at least not in stock form!!!!!!!!
If you are determined to keep your trusty little old h1c, and it has never given you any problems and is still in good working order................You can!......... BUT that compressor housing has got to go!!! HTT and others sell a up grade for your compressor side of the turbo. You will have to call and get the details,..........JUST MAKE SURE YOU GET THE "INTERCOOLED" OUTLET HOUSING!!!!!!!!(V band)
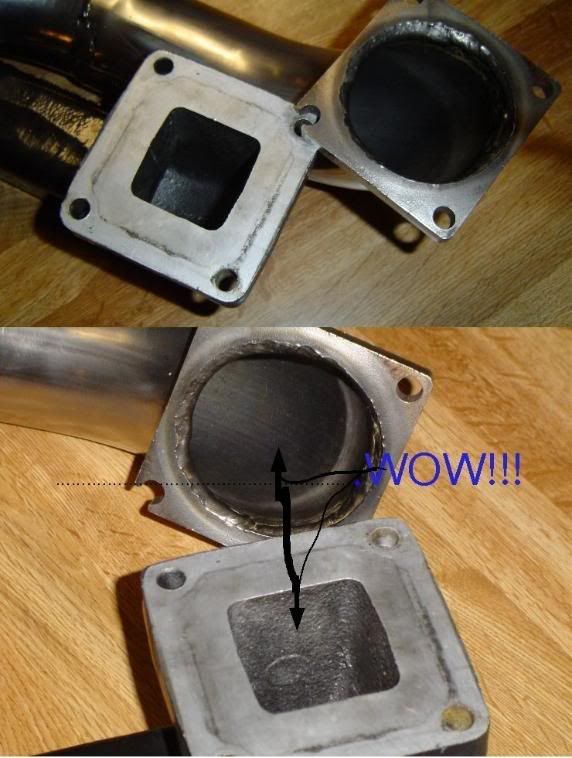
"NO MATTER WHICH TURBO YOU CHOOSE YOU WILL NEED THE ELBOW THAT GO'S,FROM THE OUTLET OF THE TURBO, AND THE PIPING."
My choice, this beat up Hx 35.....but it works
................................(94) (95-98)
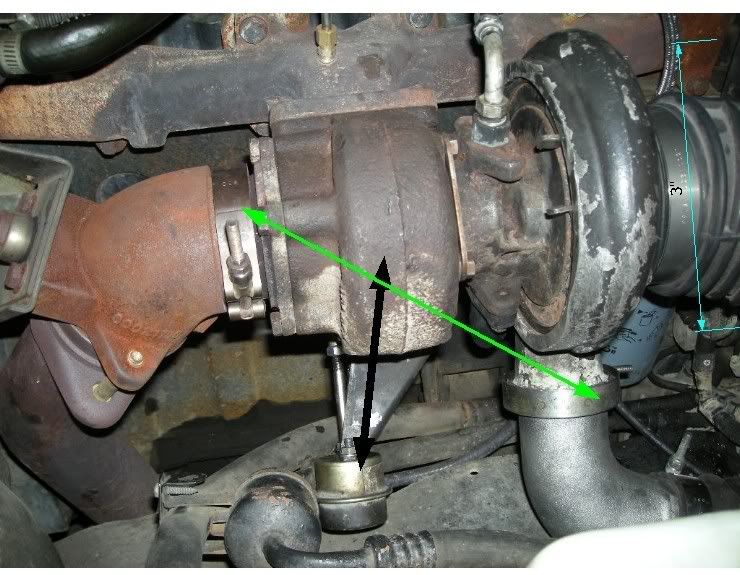
12 valve"2nt gen" (Wh1c )(HX35) Blue arrows=4" compressor inlet. Green=compressor and exhaust outlet "V band" Black= waste gate actuator on hot side of turbo Wh1c would be smiler Sorry don't have a picture of it.
“Wh1c” or “12v HX35” (94-98)
For mounting purpose, these two are identical. The only modification would be to move your exhaust back ½ of and inch. Moving this back, may or may not cause some small exhaust clearance problems.
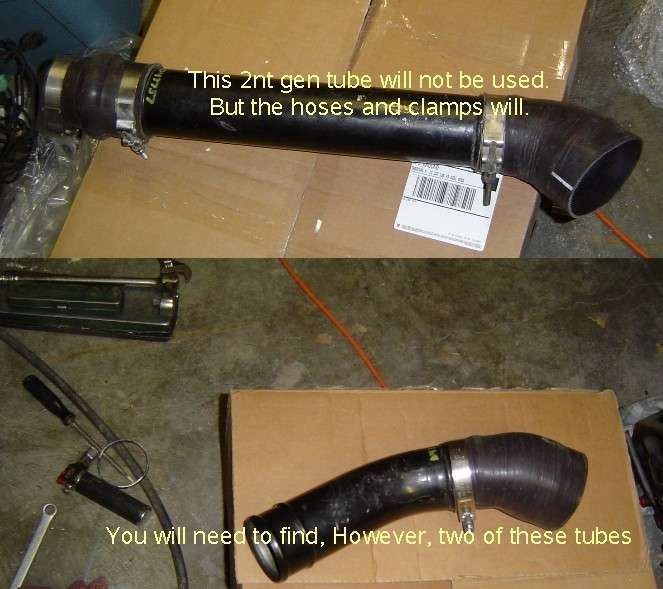
The lower tube in the picture above, will be used on the R or passenger side, HOWEVER, this metal tube will be used on the L or drivers side also. All factory 2nt gen part will be use......Except the intake air horn and the long tube above....Yes that means you will need to get (2) of the lower metal tube to complete this project as well as a intake air horn that will fit this combo
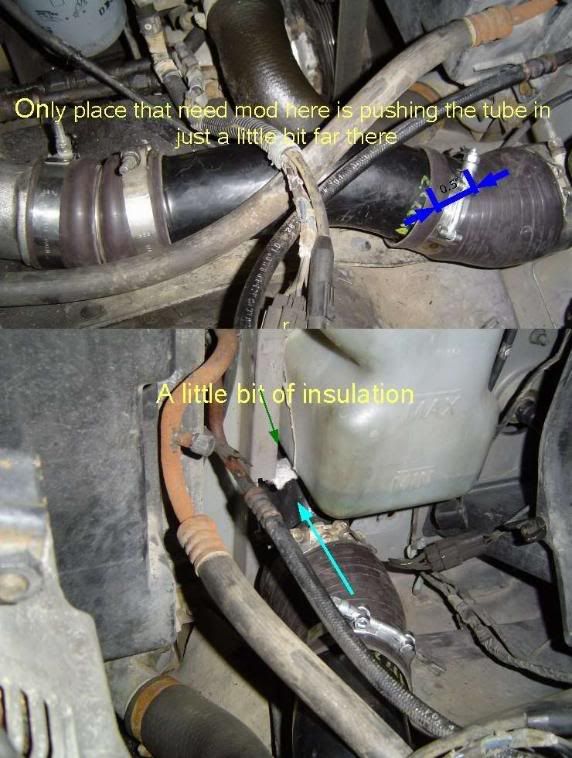
Hot side done with vary little modification required! Were indicated, need to be push into the boot ½" further then stock
If your trying to keep it stock looking, you will also need a 91.5-93 air box and tube to the turbos inlet.
Well if you use the factory boots, clamps and a second (R) tube, you're half way there. The right side tube is shaped perfectly to maneuver around the battery tray on the (L) side or drivers side. The factory upper boot go's on top of that.............................................. ................
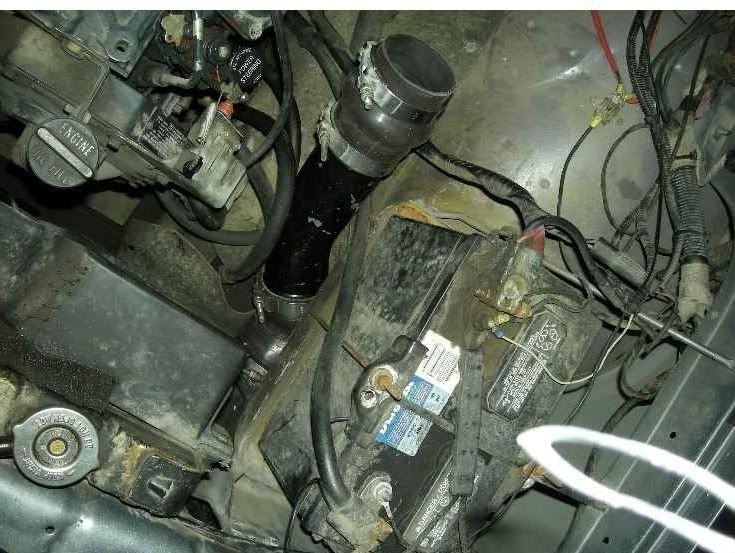
Now, how do we get it from there to the intake??????
Well, this is were Tim and i did a lot of mail tag to come up with a "CoolerTubz" that fits the bill perfectly
Here is one of the proto Types, trying to eat the stock cross over tube
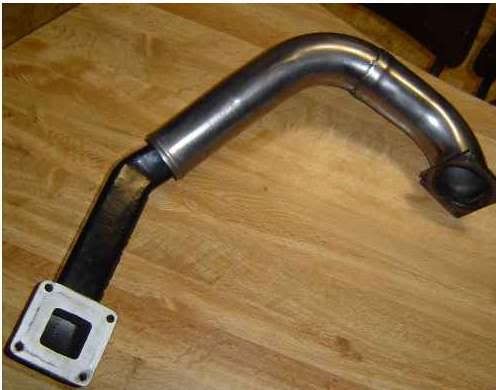
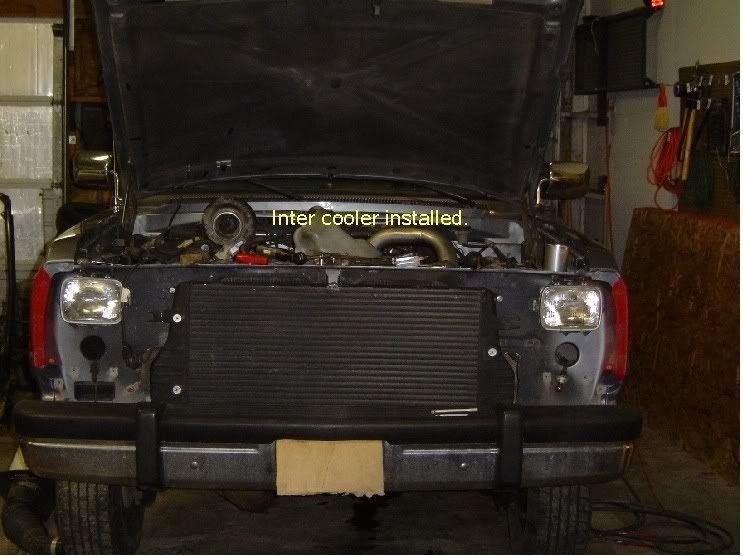
And the final dezine, fiting perfictly, with all its shine

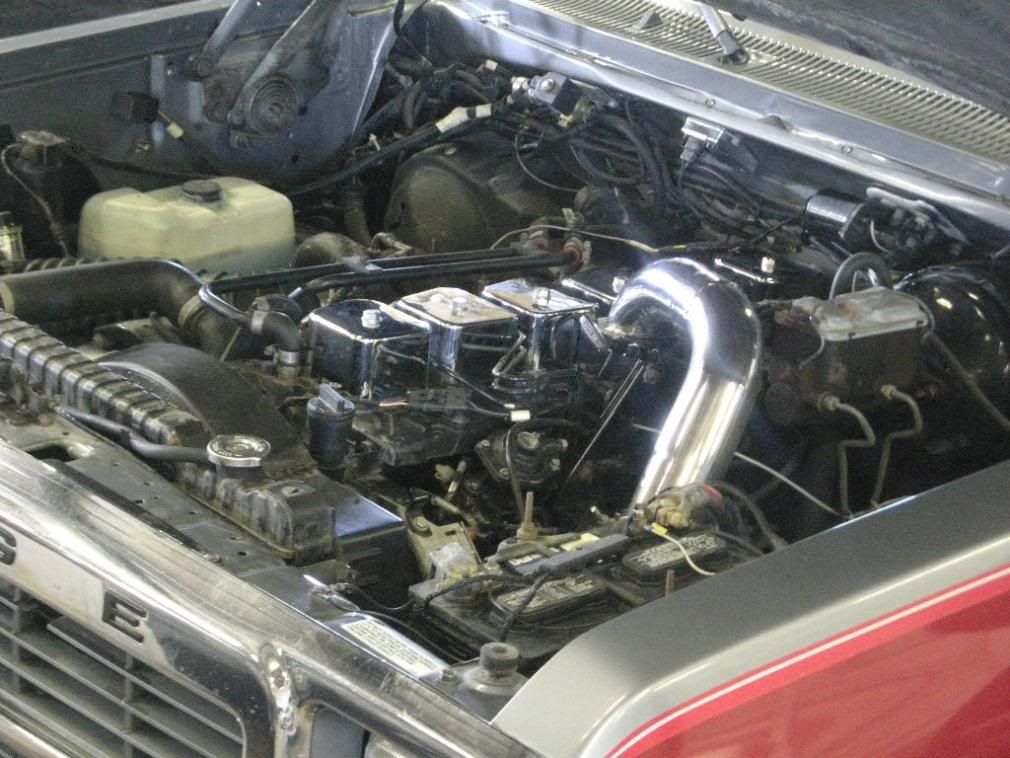
And even with this masive 3" stainless steal "CoolerTubz". There is allmost 3/4" of hood clearance (And that with the hood insullation still under the hood!!!!) and plent of space for the master sylinder too!
And here is one more real interesting picture............Can you say FLOW!!!!
All that fancy-ness in a stock aprering truck.

And last but not least.....................MY PARTS LIST!!!!
WHAT IT COST ME TO DO THIS PROJECT
Intercooler (used) .................................................. .............$140.00
All 2nt gen tubes, clamps, hoses............................................. $100.00
Beat up old Hx35 with elbo.............................................. .......$100.00
Lower Bracket........................................... ...........................R $6.20
.................................................. .......................................L $7.10
Rubber mounts for above bracket.................4.85 X 2.......... .........$9.40
Tim's Intake Air Horn "CoolerTubz"...................................... .....$160.00
__________________________________________________ ____________
TOTAL............................................. .......................................$522.70
WHAT IT WOULD COST YOU, IF YOU RAN STRAIGHT TO THE DEALER!!!!
52028 724AC COOLER, Charge Air...(INTERCOOLER)............................... .................................................. .......$800.00
52027 724 R BRACKET, Cooler (Intercooler lower bracket R)............... .................................................. ...............$6.20
52027 725 L BRACKET, Cooler (" " L )........................................... .................................................. .................$7.10
52027 814 CLAMP, Hose......(This is the large intercooler inlet/ outlet
Clamp) 12.85 X 2................................................. .................................................. .....................................25.70
52027 813 CLAMP, Hose..............(smaller diameter boot clamps)....
13.20 X 6................................................. .................................................. ...............................................79. 20
52027 815AB............(This will be used at the turbo elbow to pipe conection......................................... ....................73.00
52027 516AB HOSE, Duct to cooler...(large boot for intercooler....Drivers Side)............................................. ...........$156.00
52027 990AB hose, Duct to cooler Inlet......(large boot for Intercooler.... Passenger Side)...........................................$1 62.00
52027 515 HOSE, Duct to Engine (The hose that connects Tim's CoolerTubz to the stock hose.....L or Drivers
side.............................................. .................................................. .................................................. ........$73.00
52027 502 ISOLATOR, Cooler Mounting (Isolator for 724 and 725 above..lower mount, rubber) 4.85 X 2 .........................$9.70
52027 827 ISOLATOR, Cooler Mounting.... (Isolator mount for the side of the cooler.........If your using the 24v intercooler)..6.75 X 2................................................. .................................................. .................................................. ...........$13.50
52027 987 DUCT,Rt, Charge Air Cooler Inlet......( this is the right side tube or pipe that you will be using on the other side also!!!)35.00 X 2................................................. .................................................. .................................................. ..............$70.00
4746 644 PIPE, Air Transfer.......(Turbo elbo)............................................. .................................................. .............$70.00
R5010278AA Reman Turbo............................................. .................................................. ....................................$1320.00
__________________________________________________ __________________________________________________ __________
TOTAL: .................................................. .................................................. .................................................. ......$2,865.40
+ TIM WORLINE'S CUSTOM INTAKE ARE HORN("CoolerTubz")................................ .................................................. ....$160.00
Now, I don't thing any body is going to run to the Dealer with this list...........But you could.................
It gives you the part ######s for the parts you can't find else where.
BUT, If your going to pay that kind of cash for the intercooler or the turbo.......Do your self a favor, and call PDR, Htt or one of the other performance shops.........You will get a lot more performance for sim-miler $$$$$$.$$
Note: these numbers, are as of, 2/1/2008.........And they are list prices.....so they can be had for less...............But Even at $1,055.00(good guy discount) you can buy a much better turbo then a stock 2nt gen turbo.........As of today, all of these parts are still available!!!!!!!!!!!
NO NS1 STATUES YET
YOU CAN FIND TIM "TWorline" HERE AT 1stgen.org, or E-mail him at.....................
TNTSound@tds.net Just tell him Flash sent ya............He will fix you right up!
He has the spec's now, and will fit as my pic have showed.......vary nicely

Good luck, and I hope yours turn out EVEN better them Mine
