Done.
I ended up completely freestyling this project and didn't follow the DTR sticky much, if at all. I decided it was better to fully comprehend what I was doing instead of mindlessly sticking wires together because someone else said to.
From the top. Why do relays? The factory harness is doo doo. Adding relays takes a load off the harness and allows you to run a full 12v through your headlights, making them brighter. If you understand how a circuit works, you can do this. Each relay handles either the low beams or the brights. I used different color wire for ground, brights, and low beams to make finding potential problems easier to find. The factory wire for each high and low beams will act as a trigger to the relay. This is all the more factory wiring I used. I used shrink wrap on every connection and I love it. It keeps corrosion out. Finding uninsulated terminals can be tricky, so I pulled or cut the yellow insulation off the terminals.
You'll need the following- (if you choose to do it the way I did)
x2 30 amp relays {I used BWD 3177 form O'Reilly's}
x1 30 amp self resetting circuit breaker
x12 or so 1/4" 12 gauge female spade terminals {Allow for several screw ups. These will connect to the relays.}
x8 or so 3/8" 12 gauge female spade terminals {Same as above ^ These will connect to the lights.}
x3 or so 3/8" 12 gauge ring terminals {Same as before ^ These will connect to the battery terminals.}
x4 or so 1/4" 12 gauge ring terminals {Same warning ^ These will connect to the circuit breaker and ground it all to the core support.}
Several feet of shrink tubing {3/16" This is the best stuff ever.}
Some small zip ties {To make your wiring neat.}
At least 8' of split loom {I used 3/8" and it's tight in there. I also picked a color that offends the eyes so it fits the theme under the hood.}
25 +/- feet of 12 gauge wire {I used some really nice laminated wire that was laying around the farm left over from wiring the new dryer, but regular wire will work fine.}
Process-
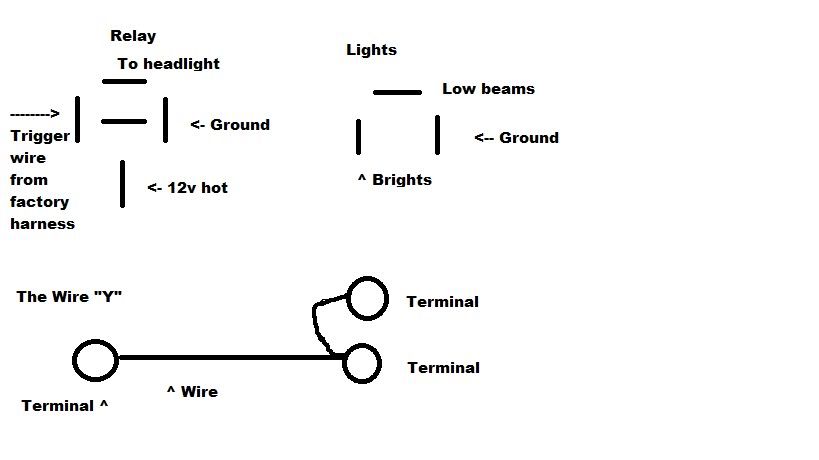
Put the circuit breaker somewhere under the hood near the battery. Use a 3/8" ring on the + post of the battery and use a 1/4" ring to connect to the breaker. It will spark like an SOB if you ground it. Make a wire "Y" to get power to the relays. The long end of the "Y" will have a 1/4" ring on it from the breaker, it will go into a 1/4" female spade, another "jumper" wire will come out of the same 1/4" female spade and the other end of the jumper will have another 1/4" female spade on it for the other relay. Make another wire "Y"for the ground and connect it to the (-) side of the battery. Now you have power and ground for each relay taken care of.
You will do the following twice. Once for high beams, once for low beams. Take a wire that can reach from where you put your relays to the driver's side head light. Cut another wire that can reach from the passenger's side headlight to the driver's side headlight. Stick a 1/4" female spade on one end of the short wire and a 3/8" female spade on one end of the longer wire. Twist the two ends that don't have a terminal on them and put a 3/8" female spade on them.
To make a ground harness, cut a long length of wire that can reach both headlights across the core support. Put a 3/8" female spade on the passenger side end. Cut another piece of wire that can reach from the driver's side head light to where the lights ground on the core support. Put a ring on one end of the short wire. Twist the two wires together and put a 3/8" female spade on it like you did for the power.
Now all you have to do is hook it up.
Artist's rendition of how to hook the wires to the relays and head lights
Hopefully this is a helpful narration of a practical modification.
